
Scripting Shaders in Maya
A Color-Mapped Shader
(Maya Versions 7.0 to 2011)
by Wesley Howe
First, a look at what we will be working on:
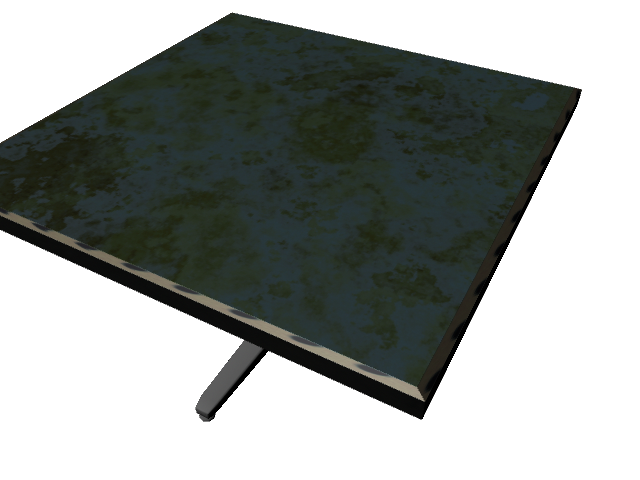
Above, a table mesh using the color-mapping shader and the color map used.
The same model as first image, same color-map texture, different pattern file applied to ChannelR.
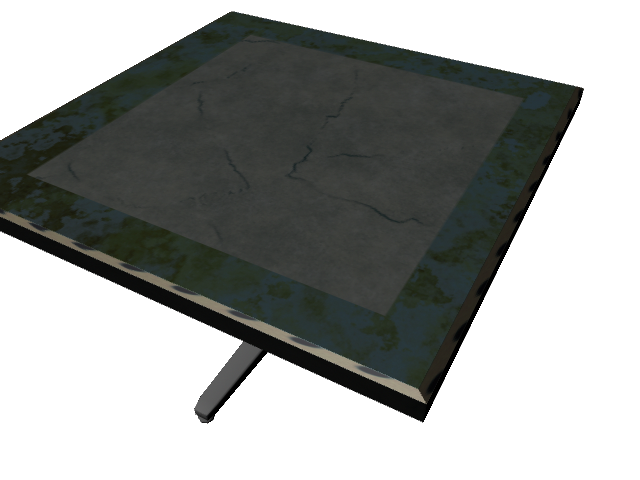
Same model, same pattern files as above, with a blue square added to color-map texture file.
The patterns I used are from a library of patterns I have whose terms do not allow me to upload the raw texture images separately. You can use any that you already have, or download them from sites that have "free texture images" (Google says there are some 24 million available when I looked). Or you could use one of the plethora of image editing programs available all over the web universe to actually make some yourself. We don't usually do that at home, but if you have talent you might.
Making Shaders via MEL script
The HyperShade tool in Maya is an example of visual programming. You start with various built-in objects and utilities, called nodes, and set them into a relationship by connecting various attributes. The simplest sort of example is linking a file node to a shader color attribute in order to texture a mesh. While the simplest way to do this does not even require you to open the HyperShade or connection editor, it can be done using them. Or it can be done via a MEL script. Making a script for the simplest operations is an exercise in time-mismanagement, unless you have a whole lot of things you want arranged in a specific manner repeatedly and without error. That is where investing time in making a script makes sense.
I am going to show how to make a color-mapped shader with some variations of just three simple commands repeated in a specific order. No loops, heavy logic or special MEL programming techniques are used here, it is just a practical example of expressing something you can do with clicks and drags on screen as a sort of text list. A virtual equivalent of making a list and telling the computer to follow it for you. From a programming standpoint this is very basic stuff; something even those who like art more than science can follow.
What we will produce is a technique for texturing objects by using the UV mapping for an object and primary colors from a texture image to select which material to apply to various parts of an object. Areas that are textured Red will display the material associated with ChannelR, Green maps to ChannelG, and as you would expect, Blue to ChannelB. By initially texturing an object using these colors, patterns (or solid colors) of many types can be applied and changed without revising the texture image, and different copies of the same object can be done differently without needing to revise any parts of the object itself. In the first image above, the color-map shown on the right side controls (maps) the areas of the object that each pattern will occupy on the table top on the left (but not the pedestal, that still has the default gray lambert shader). I've tested this on Maya 7.0, 2009 and 2011. I don't have any other versions to work with here, but it is very generic MEL scripting and should work on other versions between and may work on at least some older versions also.
The primary use for such a shader is to render multiple versions of the same object in a scene using different coloration without making unique texture maps for each individual one. Uses for this could occur in clothing for characters, trim and siding colors for a building or any number of other instances where the same mesh needs to be populated in a scene with varying color schemes. These render well in the viewport or when using Maya Software, Renderman for Maya and Mental Ray, although Mental Ray seems to ignore the transparency attribute.
I am going to work with the assumption that the user knows nearly nothing about MEL, and cares only to learn enough about it to do specific, useful things. A MEL script is a basic text file that uses some command names that have been built into Maya to make specific things happen. Like language itself, the 'words' have to be strung together using a sort of grammar so that in can be understood and performed in only one specific manner, with no unintended ambiguity. Because ambiguity causes mistakes, and mistakes in programs are called bugs,
We have a few script lines that have to be used in order to make a sort of envelope to hold our list of instructions. So this empty shell will look like this:
| global proc CMShader(string
$stype) { // list goes here } |
The "global proc" part, together with the paired curly braces delimits and defines all the stuff we will put in it as a command named CMShader that can be executed later. The parentheses allow us to specify a name for specific built-in Maya shader types that will be used when we execute this, "$stype" is called a variable, which means the value can change when the script runs. That allows us to use the same list with lambert, blinn or phong shader types without having to decide which one until we want to use the script. I am going to post the whole script further on so you can download it and not have to type it all in.
The first command on the list is this:
| string $sMain = `shadingNode -asShader $stype -n MainChannel`; |
This line causes a new shading node to be built. I am not going to bog down here explaining all of the syntax requirements for how the line is made, that is the subject material of many other tutorials and even whole books; we just want to discuss how to make the whole shader here. In the line above you will see the "$stype" variable used instead of being created. That allows the text we will pass in when we execute the script ("blinn", "phong" or maybe "lambert") to be filled in when the script is used, not just when we write it. The command name is "shadingNode", which is an unsurprising name to give to a command that makes shading nodes. The command name words are run together and capitalized that way to satisfy readability concerns but to allow the script 'interpreter' to be able to recognize it as one name instead of multiple words. You have to have the capitalization and name very exact or the machine will not recognize it; spelling counts. But by using copy/paste that is not such a big deal.
"MainChannel" will be the name for our shader. In Maya, if there is already a "MainChannel" node (because maybe this is the second time we used the script in the same scene) Maya will add a "1" (or 2 or 3 or more) to make it "MainChannel1". All of the nodes need to have a unique name, and Maya automatically manages all this for us. The "$sMain" is a variable that get created and filled with the final name Maya used, so that we can refer to this node later by exactly the right name when we connect it up without needed to know ahead of time if there will be any extra digits that need to be specified.
We use this same command four more times, to make four more shading nodes, with a few tweaks to make them all have different names we can use later:
| string $sKeyChan = `shadingNode -asShader
$stype -n KeyChannel`; string $sRChan = `shadingNode -asShader $stype -n ChannelR`; string $sGChan = `shadingNode -asShader $stype -n ChannelG`; string $sBChan = `shadingNode -asShader $stype -n ChannelB`; |
Now we use a different command to set the color attribute of the three color channels (ChannelR, ChannelG and ChannelB) to something other than the default gray they are created with:
| setAttr ($sRChan + ".color") -type
float3 1.0 0.0 0.0; setAttr ($sGChan + ".color") -type float3 0.0 1.0 0.0; setAttr ($sBChan + ".color") -type float3 0.0 0.0 1.0; |
The built-in Maya nodes (those that it understands without a special plug-in being used) have predefined attribute names, and "color" is an attribute of the shading node (there is a list for every node type in the Maya documentation, and there are lots of them). "setAttr" is the command that sets the attribute; by using a variable we created earlier ("$sRChan") with ".color" tacked onto it we will be able to set a specific attribute for a specific node. The "-type float3" is there for the interpreter to understand that there are three real floating point numbers coming next, and "1.0 0.0 0.0" are those numbers, the ones that specify a Red color. We are setting these colors up now to make it easier to further refine the shader when we actually use it later.
We're going to go a little faster now, look at the next three next lines:
| string $sMultR = `shadingNode -asUtility
multiplyDivide -n sChanMultR`; setAttr ($sMultR + ".operation") 1; connectAttr -force ($sRChan + ".outColorR") ($sMultR + ".input1X"); |
Here we create a utility node of the "multiplyDivide" type, which is really a small program all packaged up that either multiplies or divides two inputs to one output, but does this in triplicate so we can manage Red, Green and Blue separately. The second line is what specifies that the operation will be a multiply (you have to look that up in the documentation to know what value to use) and the last line is a new command being introduced, "connectAttr", which allows you to connect an output attribute from one node to an input attribute of another. That is how we actually "program" our growing collection of nodes to do something specific for us.
That is all of the commands you need to know to do the job, we just have a bunch more of them to finish the job. There is an additional utility node type "plusMinusAverage" that will be used later to add various color components together, rather than multiply their values. I am just going to show the whole script now, including parts already discussed:
| // Color-Mapped Shader // Copyright (c) 2011, Wesley Howe, 1 March, 2011 // All Rights Reserved // Released for use under Creative Common Attribution Share Alike (CC-BY-SA) // That means use it for free, repost it for free use, and change it all you want while retaining // credit for the parts that were my contribution. It is only just courteous to do that for anyone. // // Usage: CMShader("blinn"); // The string is the Maya shading node base type, lambert, blinn and phong were tested // global proc CMShader(string $stype) { // create the channel nodes string $sMain = `shadingNode -asShader $stype -n MainChannel`; string $sKeyChan = `shadingNode -asShader $stype -n KeyChannel`; string $sRChan = `shadingNode -asShader $stype -n ChannelR`; string $sGChan = `shadingNode -asShader $stype -n ChannelG`; string $sBChan = `shadingNode -asShader $stype -n ChannelB`; setAttr ($sRChan + ".color") -type float3 1.0 0.0 0.0; setAttr ($sGChan + ".color") -type float3 0.0 1.0 0.0; setAttr ($sBChan + ".color") -type float3 0.0 0.0 1.0; // connect Channel R to the multiply node string $sMultR = `shadingNode -asUtility multiplyDivide -n sChanMultR`; setAttr ($sMultR + ".operation") 1; connectAttr -force ($sRChan + ".outColorR") ($sMultR + ".input1X"); connectAttr -force ($sRChan + ".outColorG") ($sMultR + ".input1Y"); connectAttr -force ($sRChan + ".outColorB") ($sMultR + ".input1Z"); connectAttr -force ($sKeyChan + ".outColorR") ($sMultR + ".input2X"); connectAttr -force ($sKeyChan + ".outColorR") ($sMultR + ".input2Y"); connectAttr -force ($sKeyChan + ".outColorR") ($sMultR + ".input2Z"); // connect Channel G to the multiply node string $sMultG = `shadingNode -asUtility multiplyDivide -n sChanMultG`; setAttr ($sMultG + ".operation") 1; connectAttr -force ($sGChan + ".outColorR") ($sMultG + ".input1X"); connectAttr -force ($sGChan + ".outColorG") ($sMultG + ".input1Y"); connectAttr -force ($sGChan + ".outColorB") ($sMultG + ".input1Z"); connectAttr -force ($sKeyChan + ".outColorG") ($sMultG + ".input2X"); connectAttr -force ($sKeyChan + ".outColorG") ($sMultG + ".input2Y"); connectAttr -force ($sKeyChan + ".outColorG") ($sMultG + ".input2Z"); // connect Channel B to the multiply node string $sMultB = `shadingNode -asUtility multiplyDivide -n sChanMultB`; setAttr ($sMultB + ".operation") 1; connectAttr -force ($sBChan + ".outColorR") ($sMultB + ".input1X"); connectAttr -force ($sBChan + ".outColorG") ($sMultB + ".input1Y"); connectAttr -force ($sBChan + ".outColorB") ($sMultB + ".input1Z"); connectAttr -force ($sKeyChan + ".outColorB") ($sMultB + ".input2X"); connectAttr -force ($sKeyChan + ".outColorB") ($sMultB + ".input2Y"); connectAttr -force ($sKeyChan + ".outColorB") ($sMultB + ".input2Z"); // set multiply color channels to the sum node string $sSum = `shadingNode -asUtility plusMinusAverage -n sChanSum`; setAttr ($sSum + ".operation") 1; connectAttr -force ($sMultR + ".output") ($sSum + ".input3D[0]"); connectAttr -force ($sMultG + ".output") ($sSum + ".input3D[1]"); connectAttr -force ($sMultB + ".output") ($sSum + ".input3D[2]"); // connect the sum node to Main node connectAttr -force ($sSum + ".output3D") ($sMain + ".color"); // connect Key Channel transparency to Main node // As a color attribute, default black is solid. // When mapping an image file, invert the colors (white for solid). connectAttr -force ($sKeyChan + ".outTransparency") ($sMain + ".transparency"); } |
The lines that start with two slashes don't mean anything as far as the script goes, the double-slash denotes that the text following are to be comments, which are just for the use of those pesky biological computers that are banging on the real computers all day and night.
So now we will just talk about the shader this script makes, and how to use it. Just because I thought the concept of doing something different and useful instead of trying to apply creative techniques to printing out some variation of "Hello World" might be a more worthwhile endeavor for someone just starting scripting, or perhaps someone that has scripted some before but wants to learn a bit more about Maya shading nodes, or even someone that just wants to use what was built here in their work, and cares nothing about what is under the hood (or perhaps the bonnet).
So we need to know where to put our script so Maya can find it, and how to make it run when we want it to. Place the text in a file with some text editor program and name it CMShader.mel. Or easier yet, just download the latest version:
Link to the .zip script (2 KB) HERE.
Unzip this and put the file into your scripts directory. This part of the tutorial may require some hunting on your end, because part of the path name for your computer depends on your user name, what version of Windows (or OSX or Linux) you are using and the version of Maya. The path will be in your Documents or My Documents folder, under "maya/version" where version will be something like 2009 or 2011-x64 (on Windows 7, for a Mac or Linux I haven't a clue). You may have to restart Maya if it is already running to get the script recognized.
You can run the script manually by typing:
source "CMShader.mel"; CMShader("blinn");
into the command line that is located in the lower left corner of the Maya screen. Make sure it says "MEL" and not "Python" (click the label to toggle this). Then press the Return key. If you want to always do it this way instead of making a shelf button you can just click on, just skip ahead to "Usage"".
To make a shelf button, you use the Shelf Editor, from the menu Window -> Settings/Preferences -> Shelf Editor. A dialog box will open with two list panels. On the left list select "Custom", and on the right side panel, at the top, is an icon with an orange ball above a white square, with a tooltip when you mouse over that says "New Item". Click that to make a new button. It will be named "User Script". Use the Rename: entry box to name it CMShader. After doing this the focus will be lost, you have to look down in the list and reselect CMShader.
After selecting the CMShader from the list, you may want to use something
other than the standard icon, I made a custom one.
![]() You can just
right-click on the image and save it as CMShader.png, or (please) make a better
one of your own (32x32 pixels). Put that in the maya/version/prefs/icons folder
(remember "version" is your actual version, like 2009 or 7.0). Now you can click
on the little folder button and select the icon "CMShader.png" that you
downloaded. In the "Tooltip:" entry box you can put "Color-mapped Shader" and in
the Icon Label: entry box you can put " CM".
You can just
right-click on the image and save it as CMShader.png, or (please) make a better
one of your own (32x32 pixels). Put that in the maya/version/prefs/icons folder
(remember "version" is your actual version, like 2009 or 7.0). Now you can click
on the little folder button and select the icon "CMShader.png" that you
downloaded. In the "Tooltip:" entry box you can put "Color-mapped Shader" and in
the Icon Label: entry box you can put " CM".
Now click on the tab at the top of the dialog that says "Command". Copy and paste source "CMShader.mel"; CMShader("blinn"); in place of any text that is in there. Click back on the tab "Shelves" and click the "Save All Shelves" button. Then read the next section on Usage. The parameter is the name of the base shader you want used, in place of "blinn" you can specify "lambert" or "phong" (others have not been tested here,yet), or you can repeat the process and set up buttons for all three.
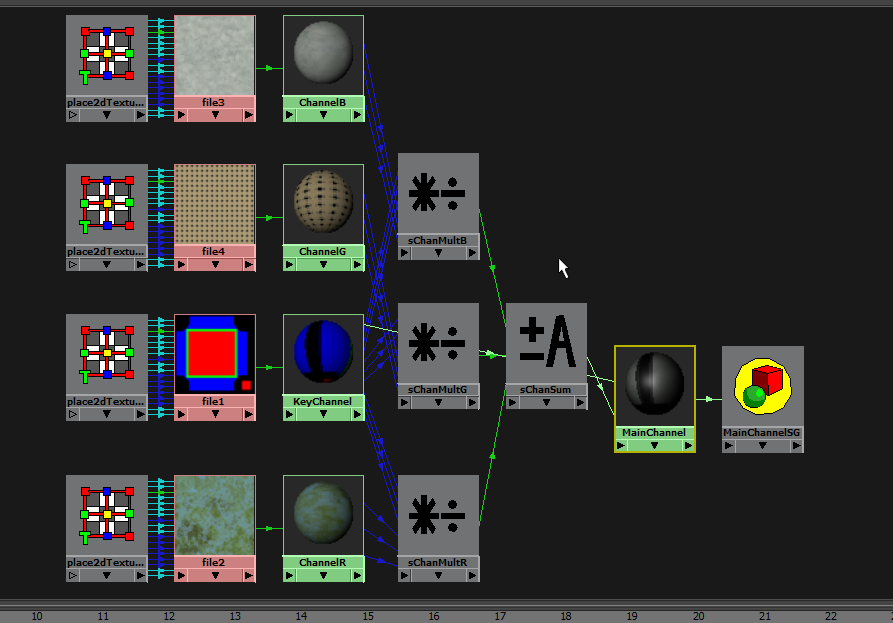
These are the nodes and connections used by the MEL script, as displayed by
Maya's HyperShade.
The left two columns were created manually by mapping textures to the
scripted channels after using the script.
The nodes in the three center columns were created and connected by a MEL script, which will
be downloadable below.
The MainChannelSG node was created by Maya when the MainChannel was used as an object
material.
(This could all be implemented without one bit of MEL script, but not so quickly
and easily).
Usage
When you click on the button or otherwise run the script, it creates a network of five shaders and connects various attributes as displayed in the diagram above. The five shaders are named MainChannel, KeyChannel, ChannelR, ChannelG and ChannelB.
MainChannel is the output to use to shade your geometry. To connect it you can select your object, then go to the Rendering menu set and use Lighting/Shading -> Assign Existing Material -> MainChannel. Upon creation the shader will generate a light gray texture, which comes from mixing a full Red, Green and Blue color with a default gray KeyChannel. The KeyChannel is where you attach a file texture to the color channel to create the color mapping, ChannelR should then be assigned to a texture or pattern that will be placed wherever there is red on the KeyChannel texture, similarly G and B Channels are keyed by Green and Blue colors. A multiplication controls the mixing, so any pixels in the KeyChannel with a 1.0 Red component will copy the full brightness of the R, G and B components from the corresponding pixel in the ChannelR texture. A half-Red component (0.5) will copy only half the brightness of the RGB components from ChannelR. You should note that the final brightness is the sum of the three Channel components, so anywhere you mix R, G or B components together in the KeyChannel (purple, yellow, aqua or gray shades) if the total of the components is more than 1.0, your final brightness will exceed 1.0, and clipping will make the colors washed out. The ability to mix colors or use reduced brightness allows you to create softened transitions where desired.
When you map texture images to the color channels of the input shaders, a place2dTexture node is created by Maya, you can adjust the UV mapping for each channel there. The UV mapping of the mesh object is used on every one of the shaders the same by default, you can adjust tiling and UV offsets for each channel in the corresponding place2dTexture node.
By design, the transparency of the KeyChannel is connected to the transparency of the MainChannel. You can use this for mapping transparency on your mesh, but not by including it in any alpha layer of the RGB mapping texture. Instead, make a separate gray-scale image. Black pixels will make corresponding textured mesh parts transparent and white will be solid. with grays being in-between. There may be a way to configure this shader to draw the alpha from the texture used as the RGB mapping, but I was unable to get a reliable result in my test (it could be an issue with the tester, though).
Issues observed with transparency are that you need to use Hardware Texturing to see transparency, you also need to make sure that you set the Textured Channel to "Combined Textures" (instead of just Color). Use the attribute editor on the MainChannel shader and check in the section labeled "Hardware Texturing" to find this attribute. Also, sometimes artifacts can be seen in the viewport from the use of transparency (this appears to be erroneous rendering of some backfaces), and Mental Ray does not seem to properly render any of the transparency, although the Maya Software and RenderMan renderers do quite nicely. There may be a MR setting that will make this work, but I do not know what that is, or why it happens.
Other Drivel:
The color mapping concept has been used in games for a long time. I developed this code initially as part of some other work to simplify texturing of mesh objects for a library of parts-pieces. I say simplify from the perspective of being able to make multiple copies of the object look different without having to edit a texture file on each one, like much else in the world it requires some extra effort up front to reap savings downstream. Initially I had cartoon characters in mind, so I could put different pants and shirts on them, but I thought that implemented as a generalized tool this might have uses for architecture or other creative activities where a like object is used multiple times and can have the 'skin' changed without having to use Photoshop on each one individually.
The script itself is straight-forward MEL scripting. The time-consuming part was researching what attribute needed to connect to what attribute. I think using standard basic Maya nodes will allow a solution like this to be used across Maya versions, as it worked on all I have here without the need for any version detection or other modifications.
Release History:
01 March, 2011: First release, tutorialized.